Make the Transition to Flow – Part 2
Why do we need to transition to Flow?
Salesforce is concentrating their future development efforts on Flow, so it’s time to take a good look at the reasons why Flow should be your no-code automation tool of choice on the Salesforce platform.
This is the second in a two-part series designed to help you get started learning flow. If you missed the first part, you can find it here.
Build on your success
Now you have conquered your very first flow, let’s tackle something a little more complex and gradually build up your skills and confidence. Before long you will be over the hump and on your way to tackling more complex flows.
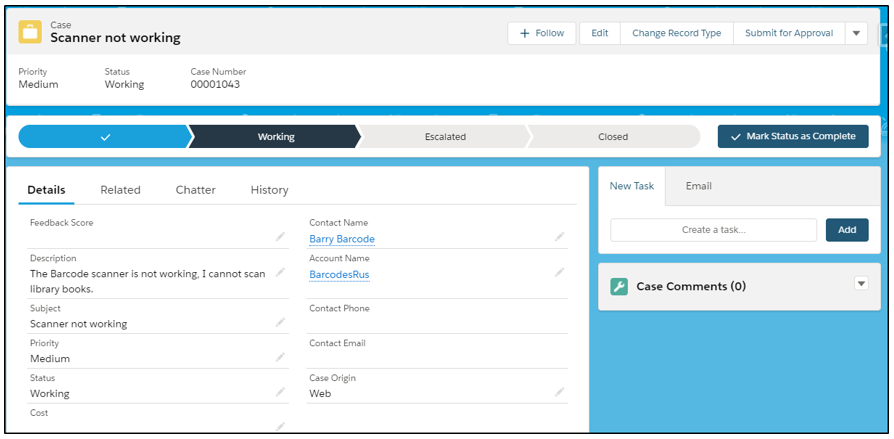
Flow 2: Customer Feedback
The challenge:
We want to get feedback on customer support issues to see how satisfied our customers are with our support service. When we are talking to the customer on the phone and we are closing the case, we will ask three quick questions.
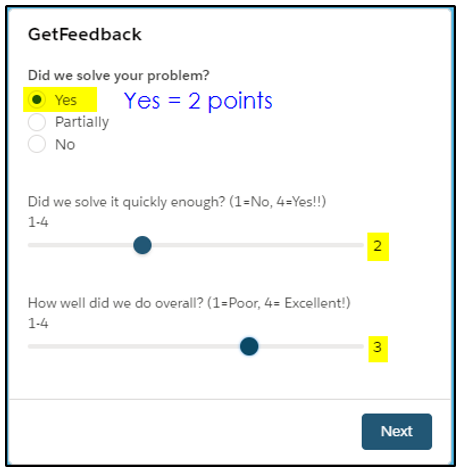
- Did we solve your problem?
- Did we solve it quickly enough?
- How well did we do overall?
For the first questions we have three responses that will earn points towards the total feedback score. The responses can be Yes (2 points), Partially (1 point) or No (0 points).
For the question Did we solve it quickly enough – there is a sliding scale from 1-4 with 4 being the fastest response we could have achieved.
The final question How well did we do overall, also has a scale from 1-4, with 4 being we did an excellent job.
The three questions give a total feedback score out of 10.
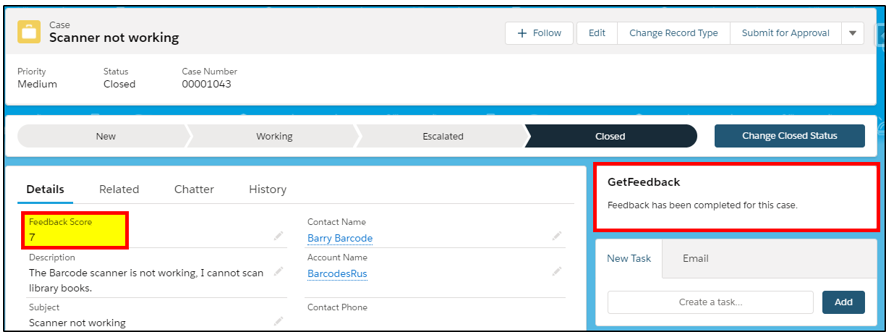
We only want the survey to be available once the case is closed. Once the survey has been completed and the total feedback score is recorded, we don’t want the survey to be available again for that case. We do not need to store the responses for the three questions, all we need to keep is the final score.
The survey will not be filled out by the customer, the service agent will do this as they are talking to the customer and closing off the case.
Flow Logic:
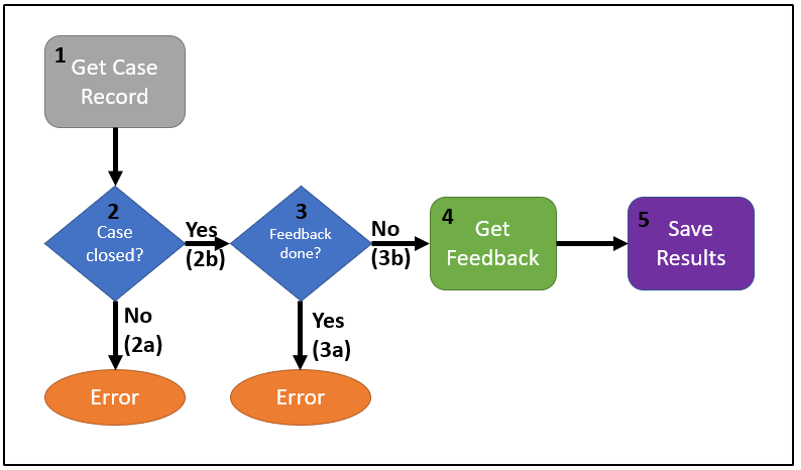
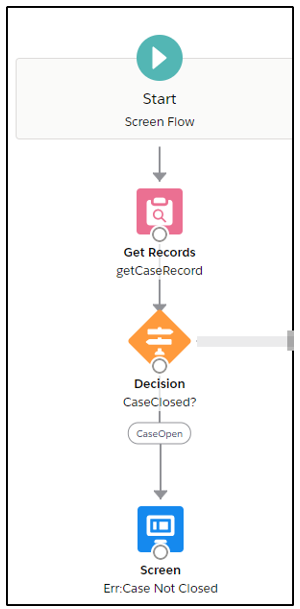
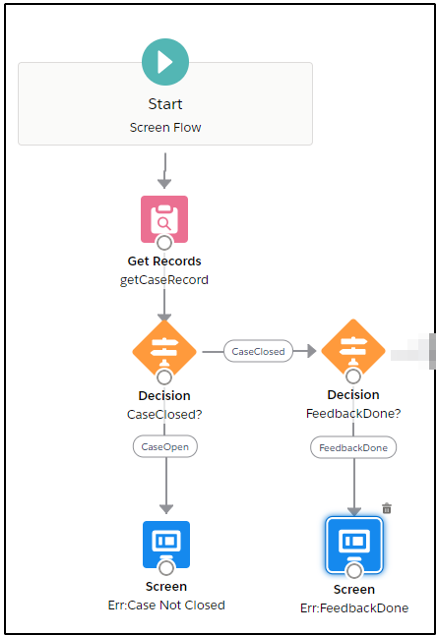
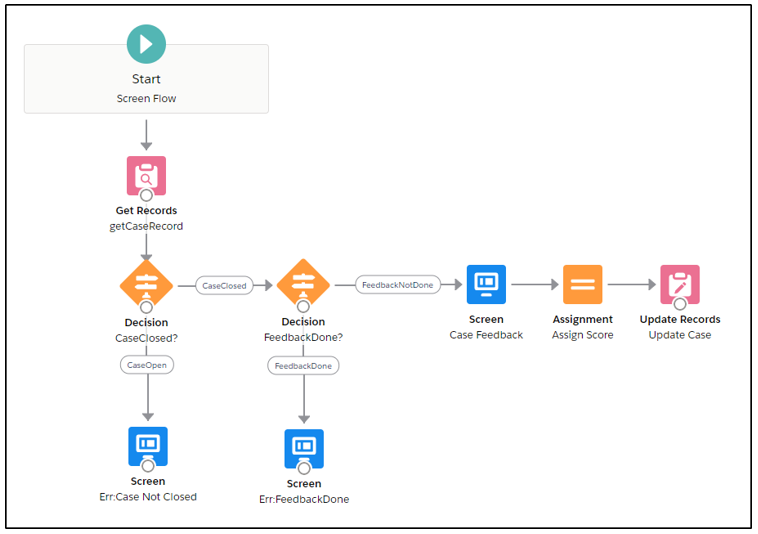
Our flow will work something like this. First, we will get the record for the case. We then check if the case has been closed. It must be closed first to get the feedback. If not, we display an error. If the case is closed, we check if the feedback has already been collected, if not we proceed to display the three questions and finally save the new feedback score to the case record.
Create a field on Case to store the result
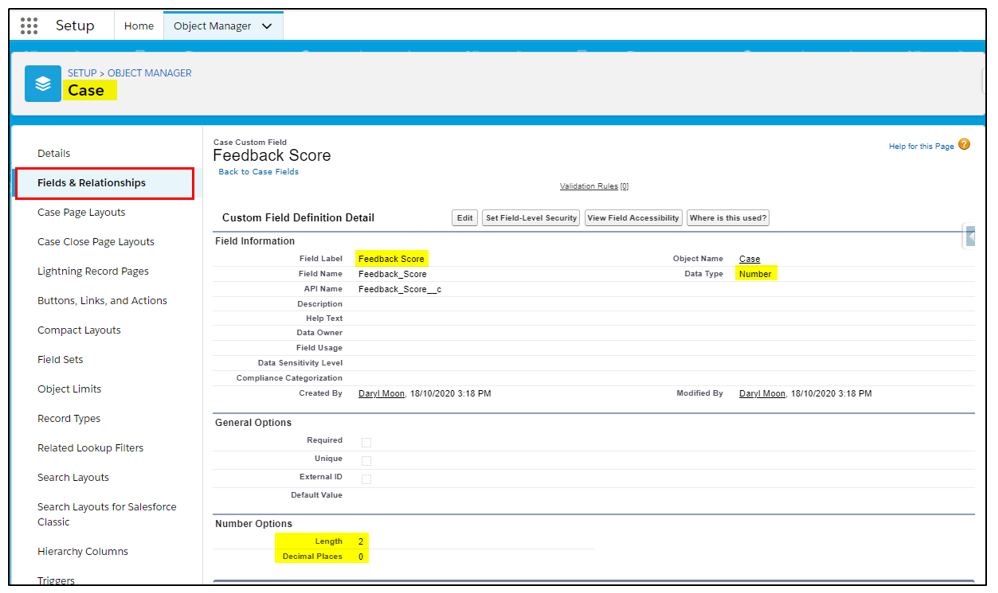
Before we start building our flow, we need a new number field on the case object to store our feedback score.
The field will have a label of Feedback Score, of type number, length of 2 and zero decimal places:
Create a new Flow
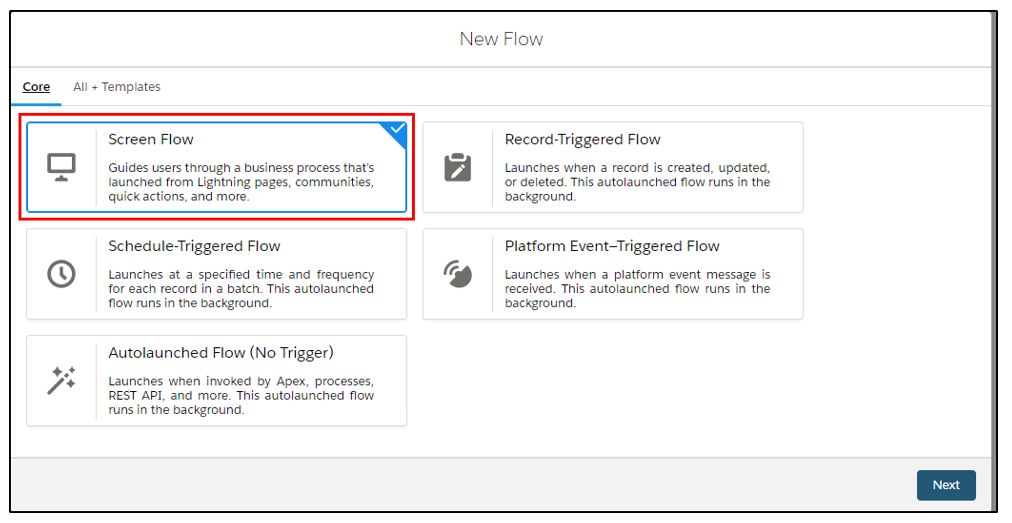
From the setup menu, select Flow and then click New Flow.
Select a Screen Flow:
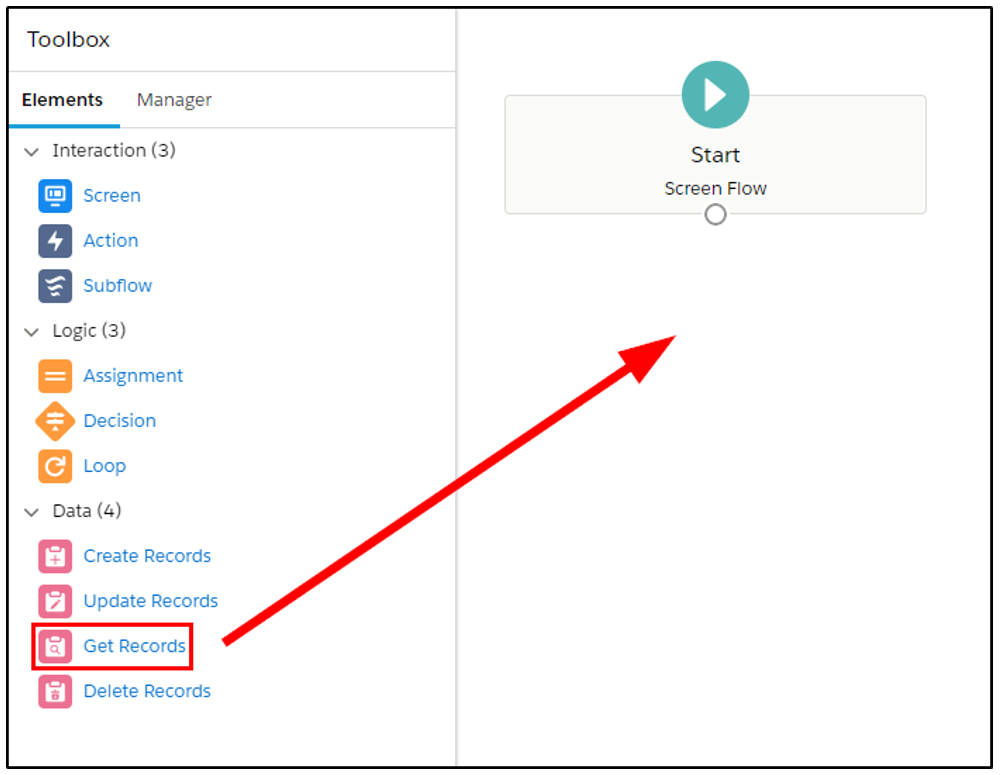
Step 1: Get Case Record
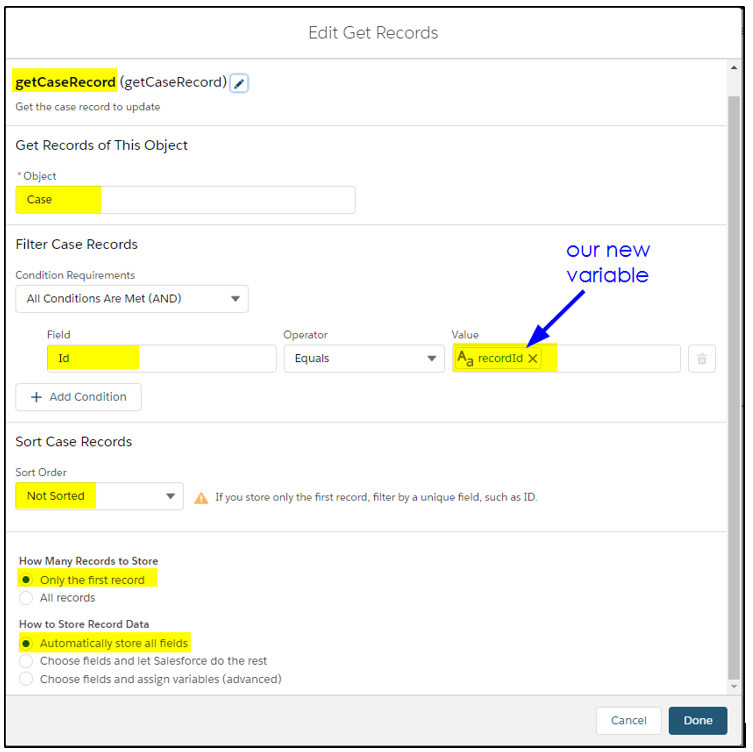
In this step we will read the case record. We will need to create a variable to pass across the ID of the case we currently have displayed, then we can get the record.
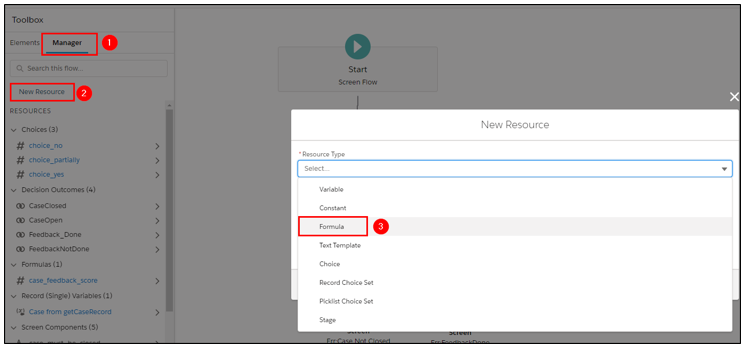
Before we start building our flow, we need to create a few variables, a formula and some choice values for our survey questions.
Variables
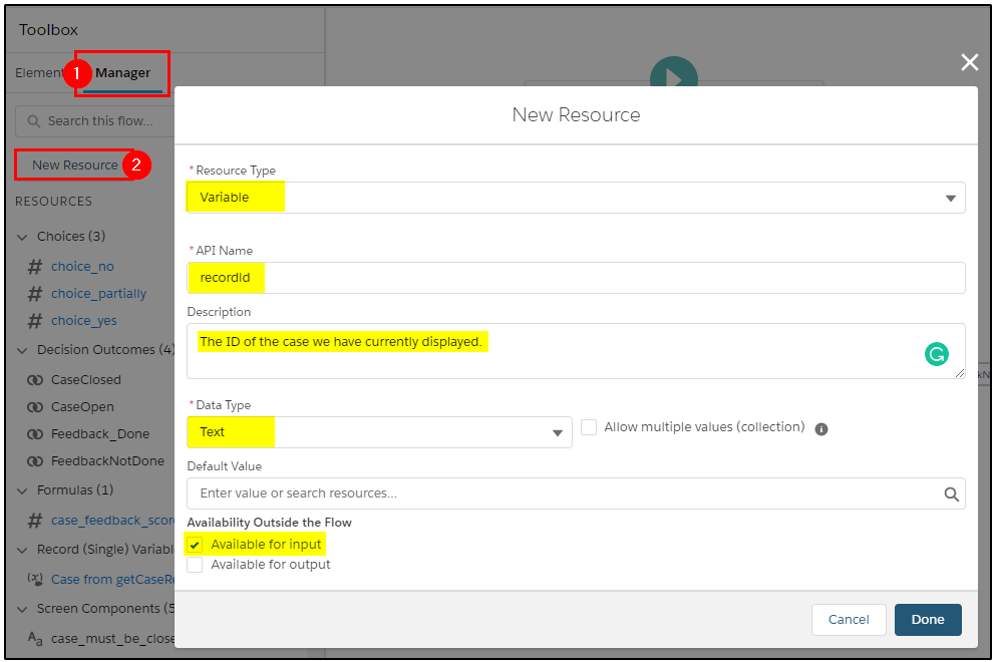
To pass the current case record to the flow so we can get the case record and inspect some of the field values, we need to create a new variable named “recordId”. The case of this variable name is very important, the “I” is a capital letter i and the rest must all be lower case. This variable will automatically be populated for us with the value of the current case record.
Click the Manager tab (1), then New Resource (2), and fill out the fields as shown below to create this variable. Note we are making this variable for Input as the value will be passed from the currently displayed case record to the Flow.
We also need variables for the problem_overall score and for problem_solved_quickly. We will use them later but create them now to make life easier. Note we make them available as Output this time because they are going to go out from the Flow and be written back to the case record.
Create a variable of Data Type Number configured as follows:
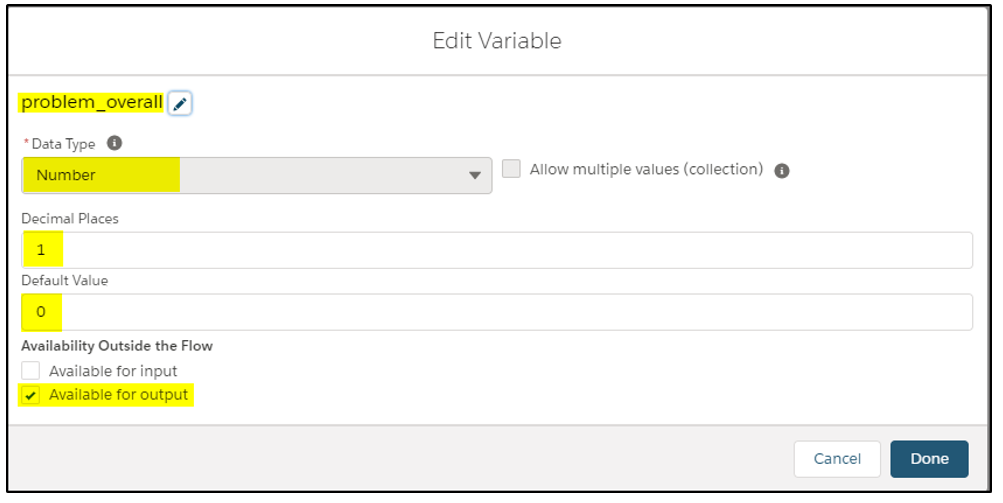
And one more variable also of type Number:

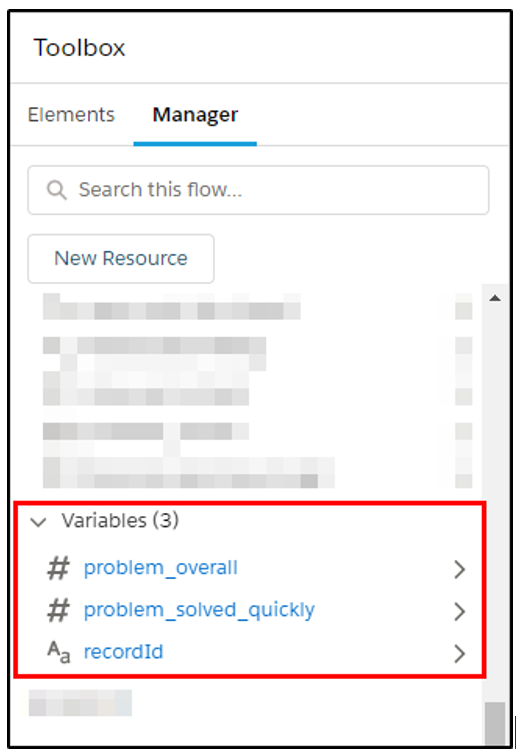
We should now have three variables:
Get the Case Record
Next, we drag a “Get Records” element onto the canvas (page).
Fill out the details for getCaseRecord as follows:
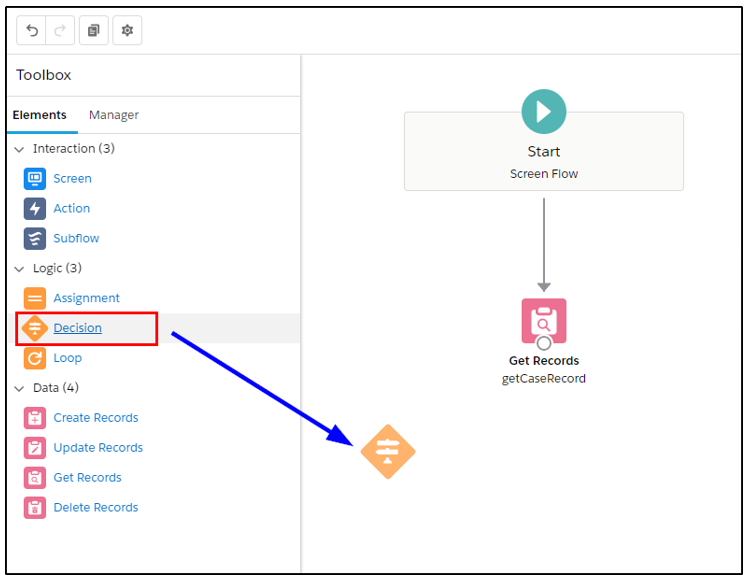
Step 2: Check if the case is closed
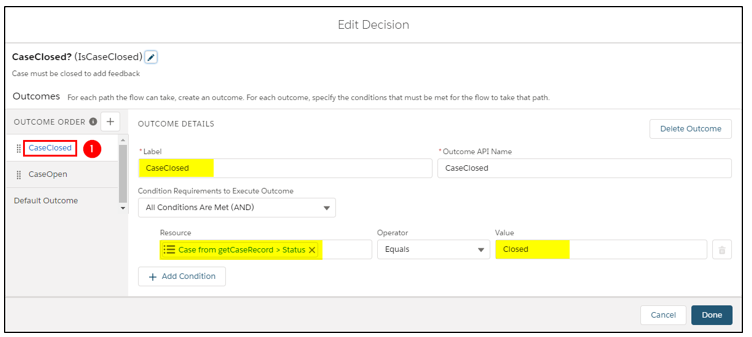
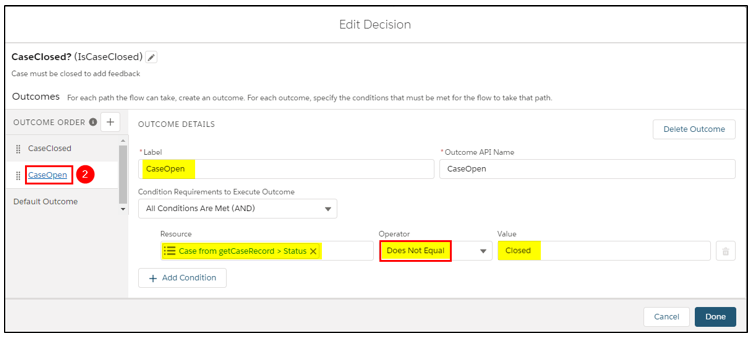
Next, we need to add a Decision element to our canvas and configure it to help check if the case is closed or not:
First, create the CaseClosed outcome:
Next, create the CaseOpen outcome:
Step 2a: If the case is not closed, display error and stop.
If the case is not closed, we can’t add the feedback now so we will display an error and stop the flow.
Drag a Screen element to the canvas:
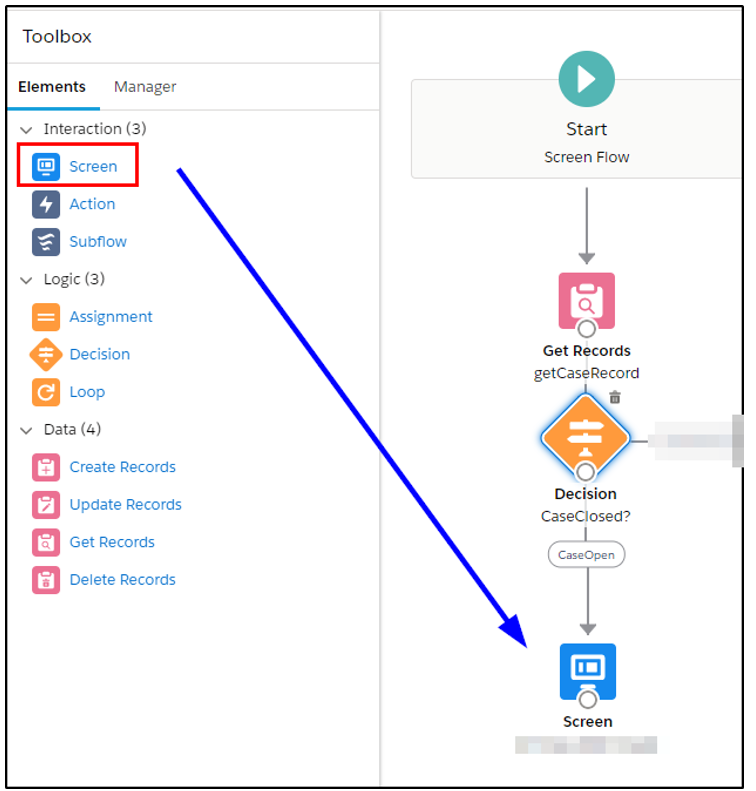
Configure the Screen element to display an error message:
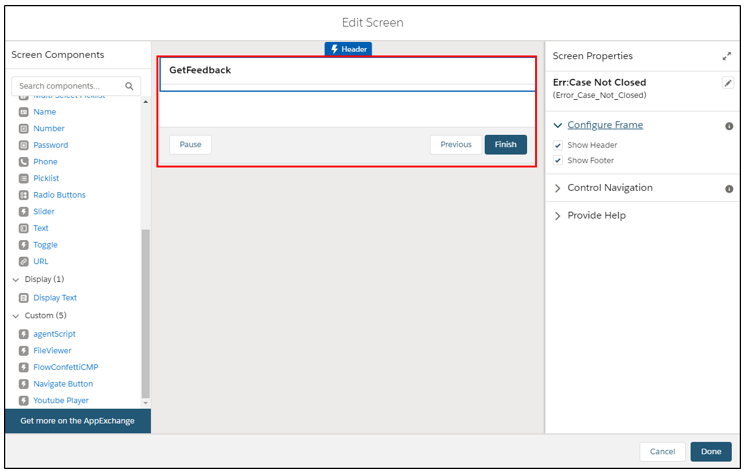
Next drag a Display Text element into the middle of the screen (1):
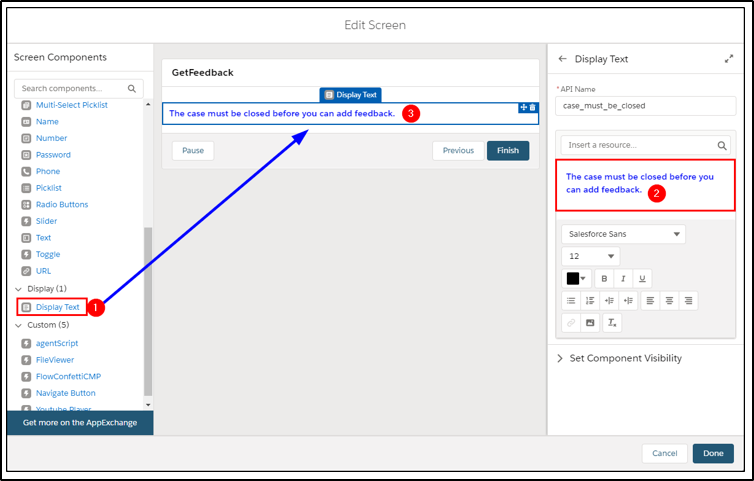
Enter the error message (2) and it will be displayed in the middle of our display screen (3).
Step 2b: If the case is closed, continue to step 3.
If the case is closed, we can continue.
Join up the elements we have placed on the canvas:
Step 3: Check if the feedback has been done
Drag another Decision element and configure it to check if the feedback has already been completed. We don’t want to do it again.
Configure the first outcome:
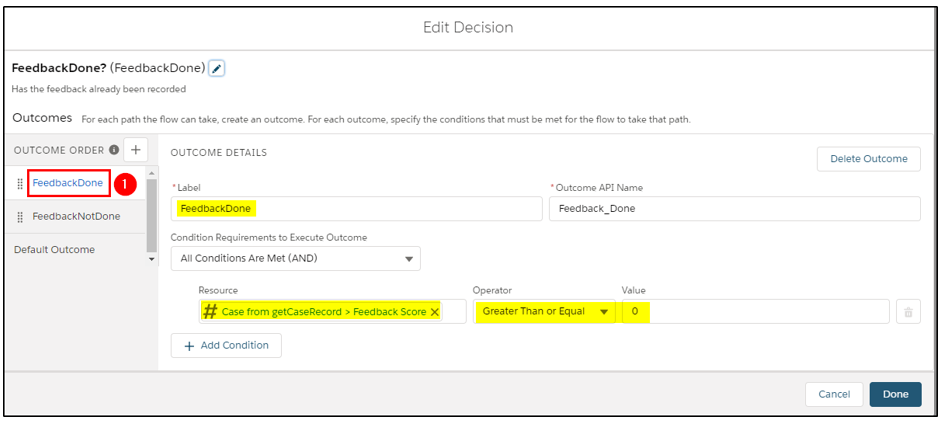
And the second one:

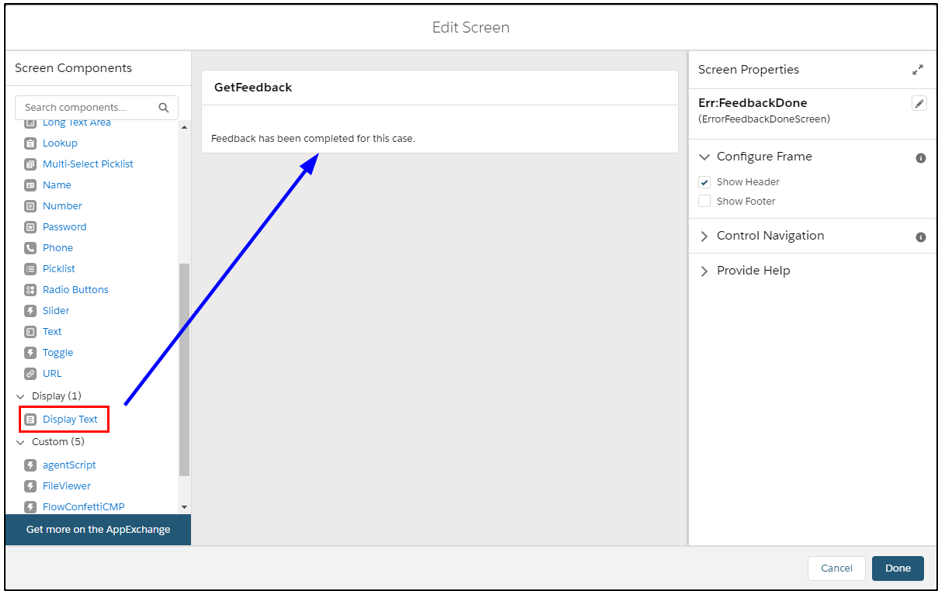
Step 3a: If feedback score > 0, display message and stop.
If the feedback has already been done, we will display a message and stop the flow. Note: This is really not an error, it’s just we have already completed this process and don’t want it repeated.
Drag another screen element to the canvas, then drag a Display Text element into the middle of the screen element and configure as follows:
Step 3b: If feedback score is blank, continue to step 4
If the feedback score is blank, we can continue and collect the feedback.
Join up the new elements we have added:
Step 4: Get the Customer Feedback
This time we need to drag a Screen element to the canvas so we can configure our data input screen that will display and capture the answers to our three questions.
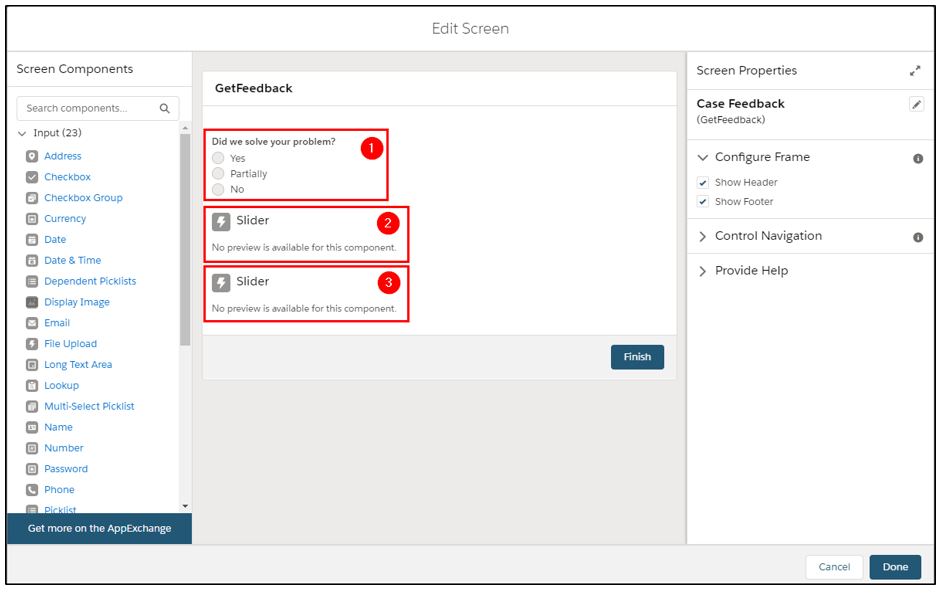
Drag a Radio Button element onto the screen:
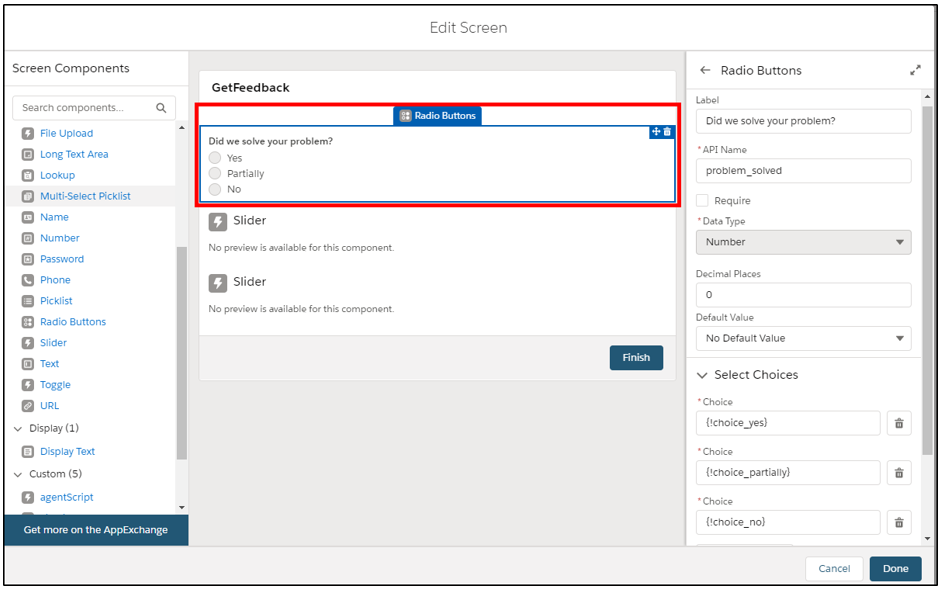
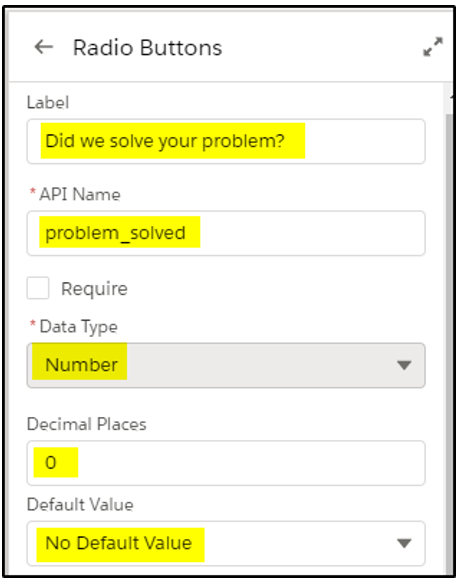
For this element, we need to configure as follows:
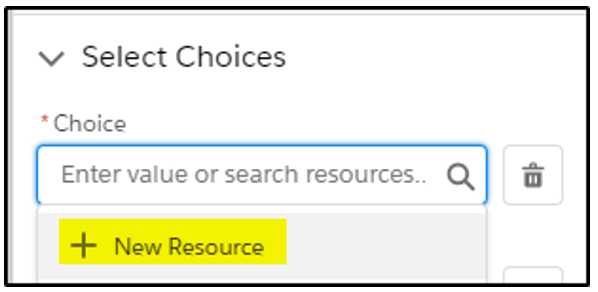
Next, we will configure the three choices:
Click in the first Choice box and click + New Resource:
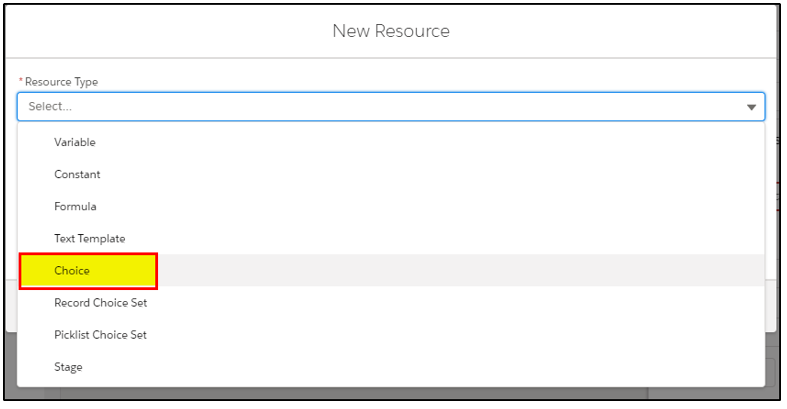
Select the type of resource as Choice:
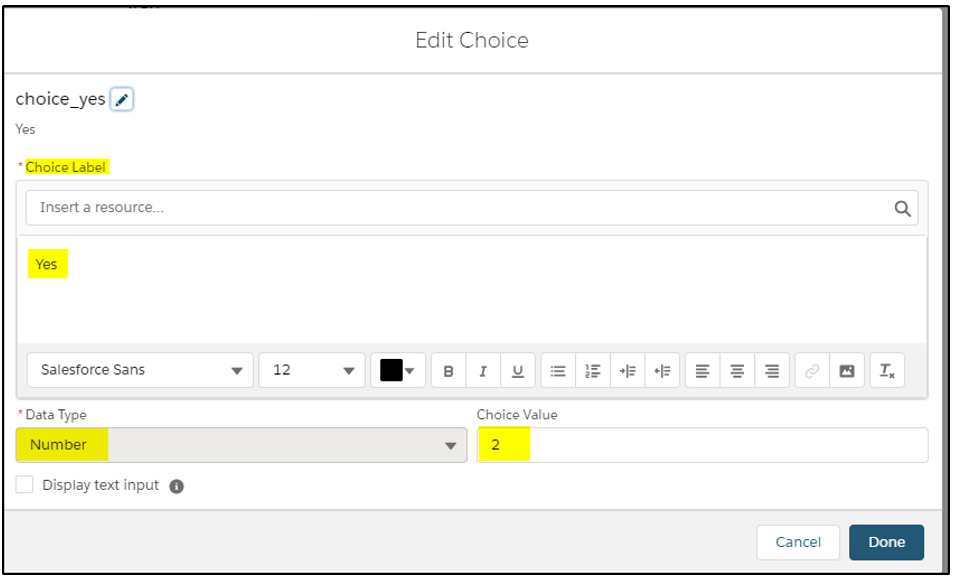
Configure the choice_yes, giving it a Label of “Yes” and a choice value of 2. This means if the customer problem was solved with this case, we add 2 points to the case feedback score.
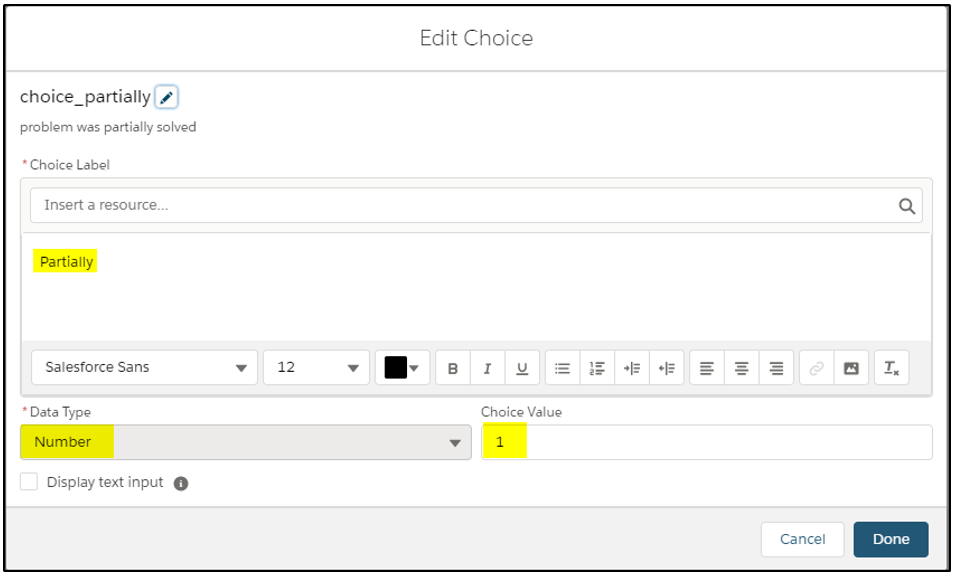
Repeat the process to add the second choice:
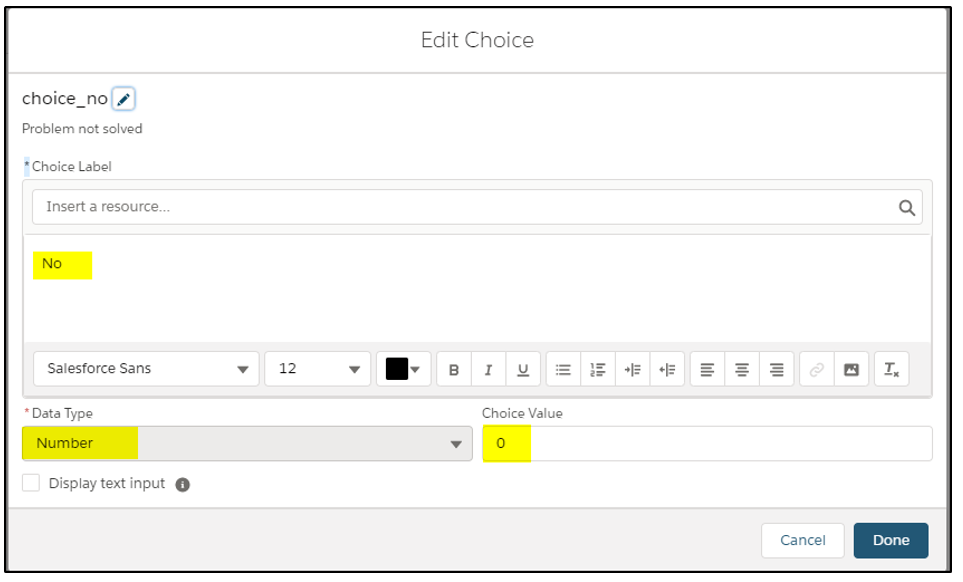
And once more to add the third choice:
The Radio Button choices config should look like this:

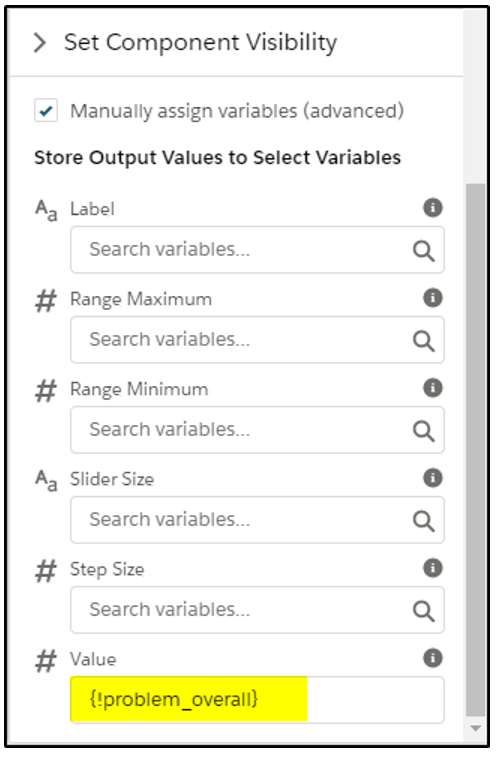
Next, we will add the first Slider and configure it:
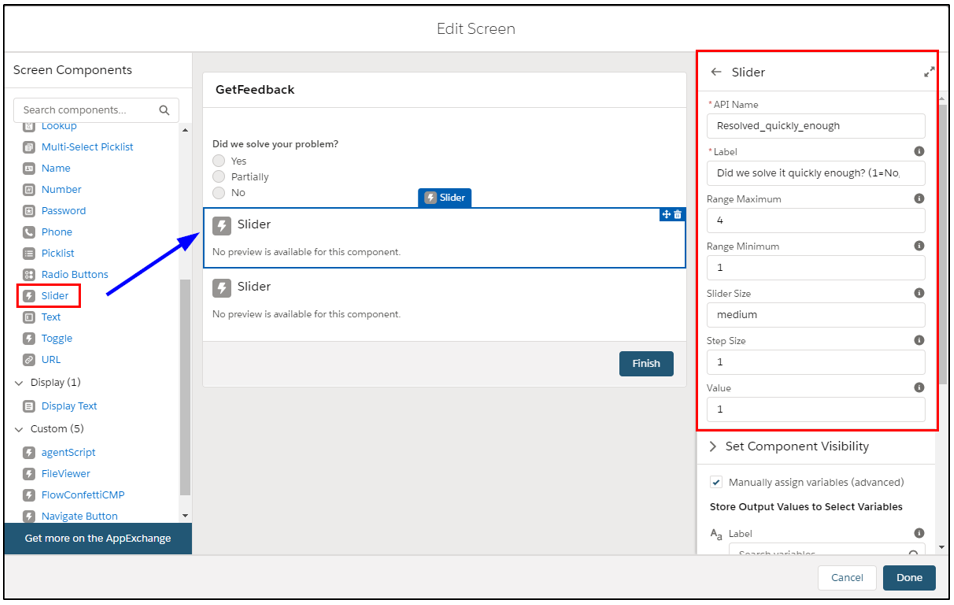
There is one more section to configure the slider, this is where the value for the slider position (where the user slides it to) will be stored. {!problem_solved_quickly}
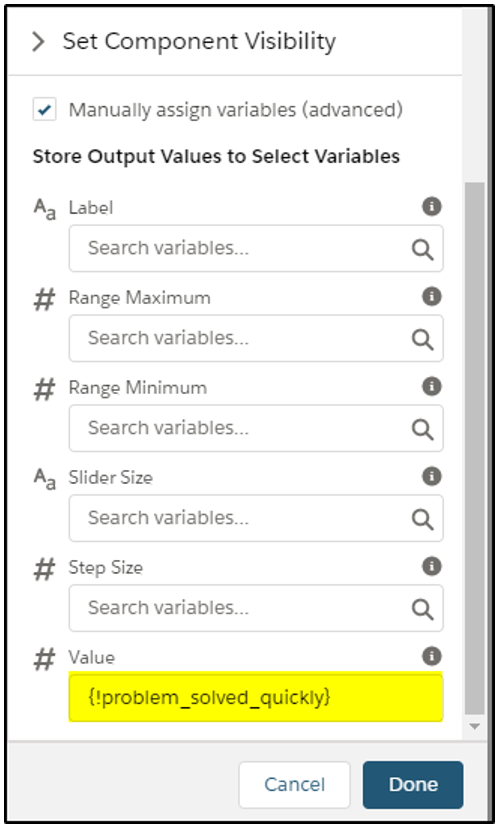
Now we add the second slider and configure it:

Storing the result in {!problem_overall} – the variable we created back at the start.
Step 5: Save the results
Finally, we need to save the results.
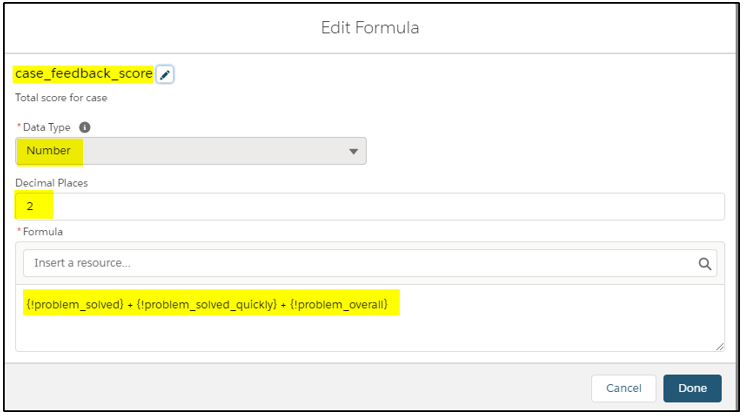
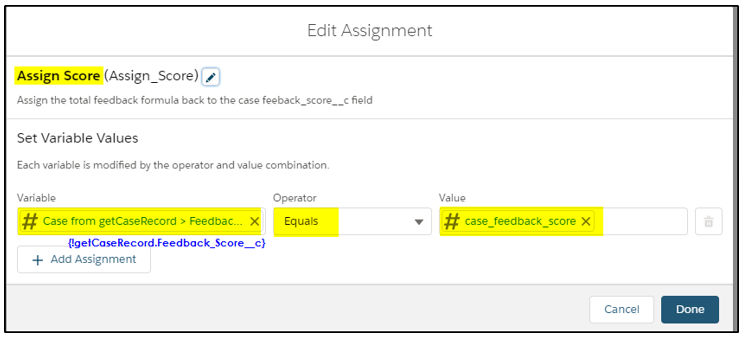
Before we do that we need to add up the scores for the three questions to get a final score (case_feedback_score). To do this we will create a new formula as follows:
There are two parts to saving the results. First, we need to copy our total score from our input screen across to the case field. Then we can save the case record.
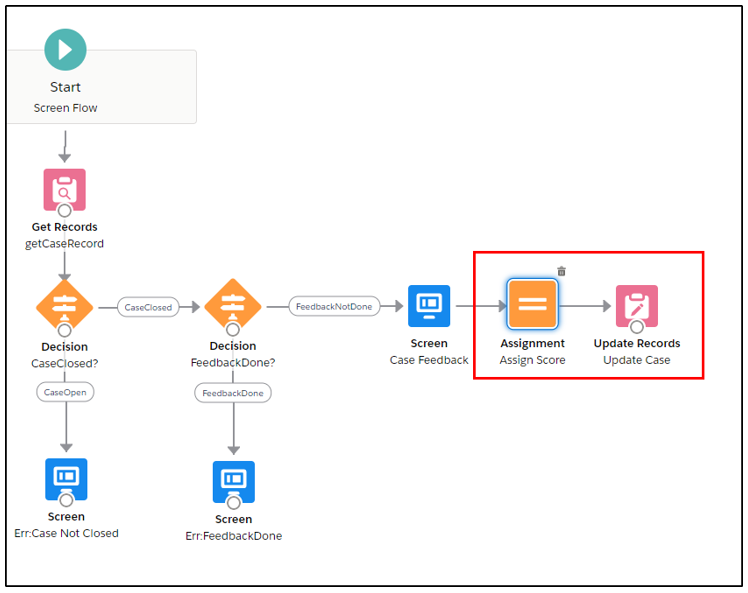
We will first drag an Assignment element to the canvas and configure that so we have the Feedback_Score__c field on the case record being assigned the value of our formula (which has added the three scores from the survey screen).
At this stage, the case record is held in memory, it has not been saved yet.
Finally, we add an Update Records element to save the new details to the case record.
Drag an Update Records element onto the canvas and configure:
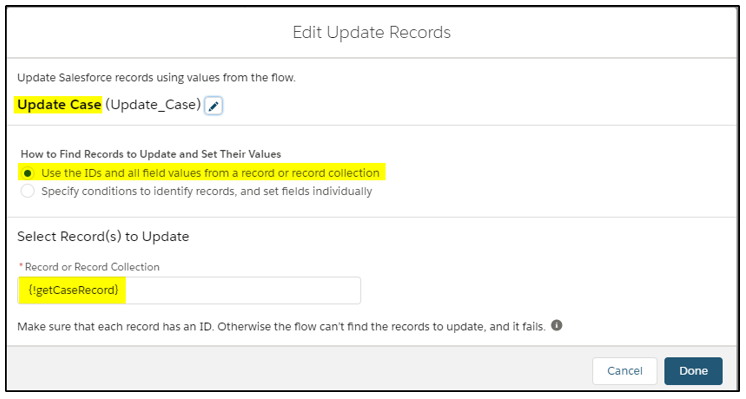
Note that we didn’t need to specify all the fields we wanted to update, we just use the complete record from our getCaseRecord element.
This final step will save the case record to Salesforce, updating our Feedback Score for the survey on this case record.
Connect up the remaining elements so the final flow looks like this:
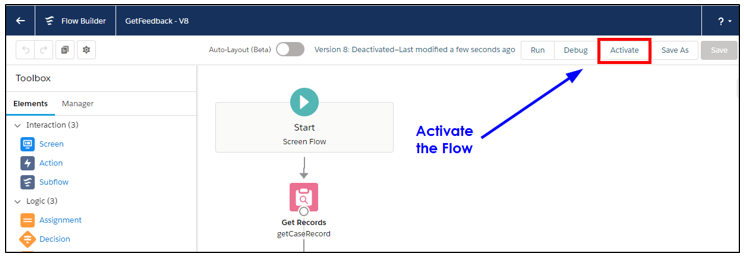
The last step is to Activate our flow. You can do this from within the Flow Builder:
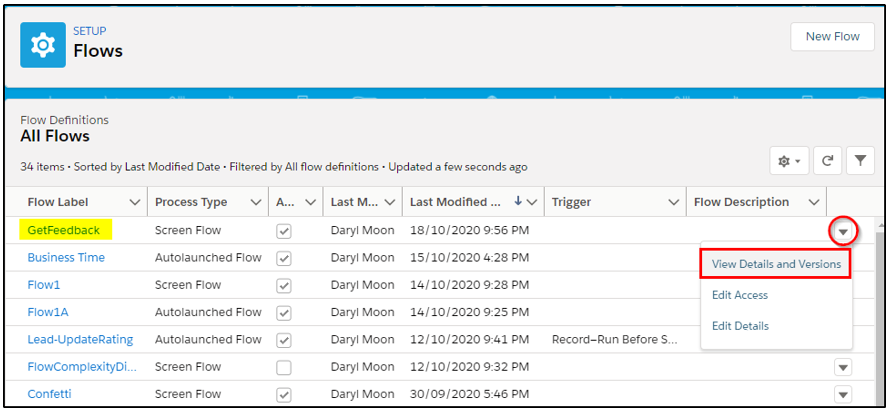
Or you can do it from the list view of all flows:
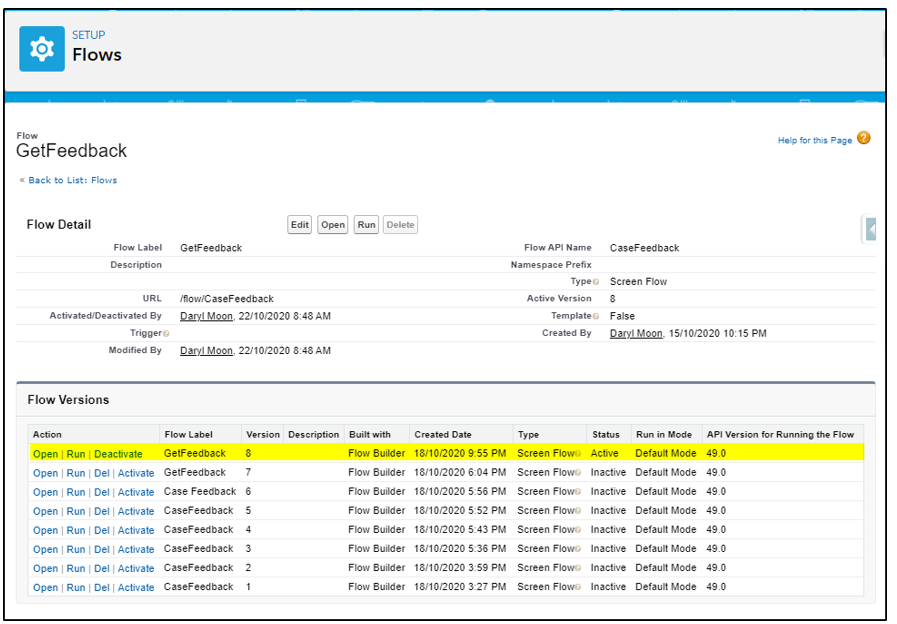
On the list of all versions, you can activate, deactivate, run, delete or edit an old version of the flow:
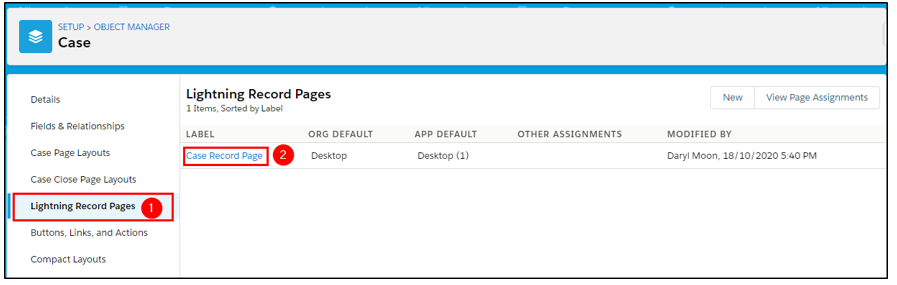
Edit the Lightning Record Page
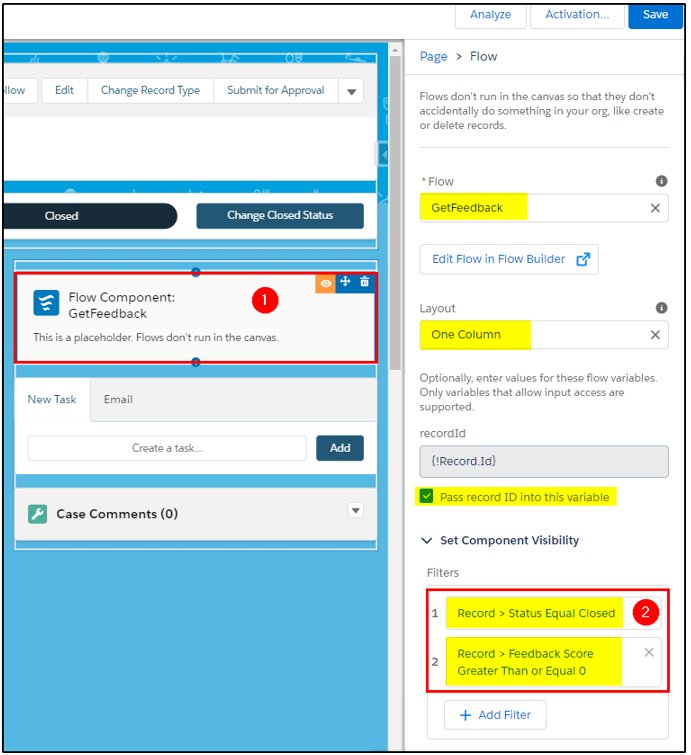
We only want our flow screen to display when a case is closed. We can configure this within the Lightning Record page as follows:
Drag a flow component onto the page as shown:
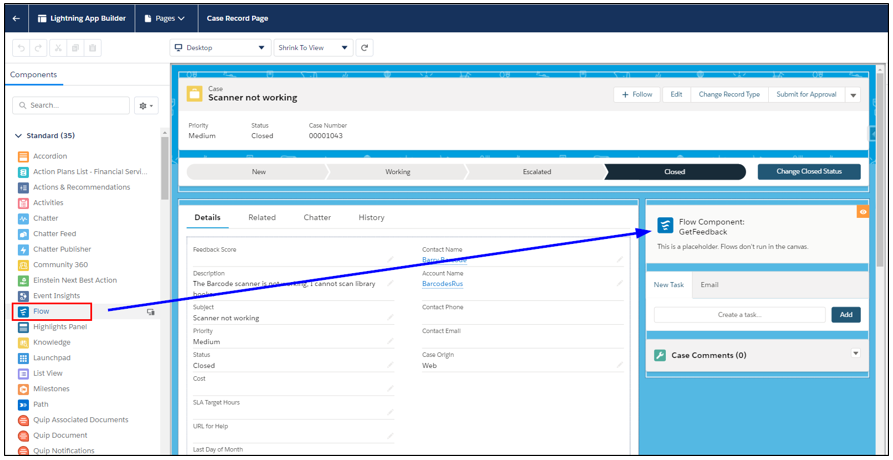
Select the new flow component (1) and configure as shown. The filters (2) control when this component will be displayed. The first one specifies to only show when the case has a status of closed and the second one specifies to show only when the Feedback Score is greater than or equal to zero. We still want the flow to display if the survey has been completed as we configured a special message for that back in Step 3a.
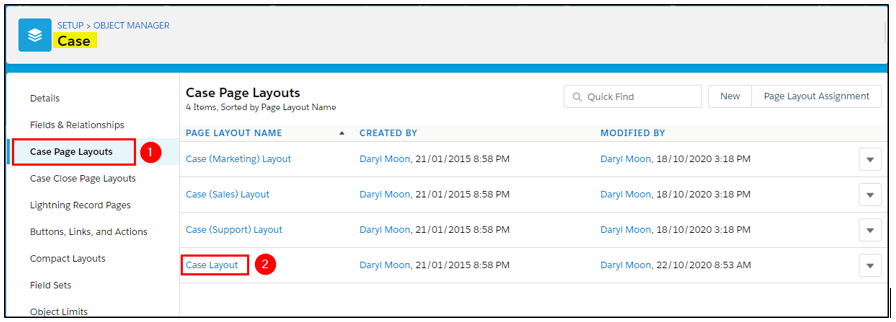
Add the Feedback Score to Page Layout
In order to see that our flow has run successfully and the Feedback score is being calculated correctly, we need to add it to the case page layout:
Drag our Feedback Score field onto the page layout. It does not really matter where you place it, in this example it was placed at the top of the page so we can find it quickly.
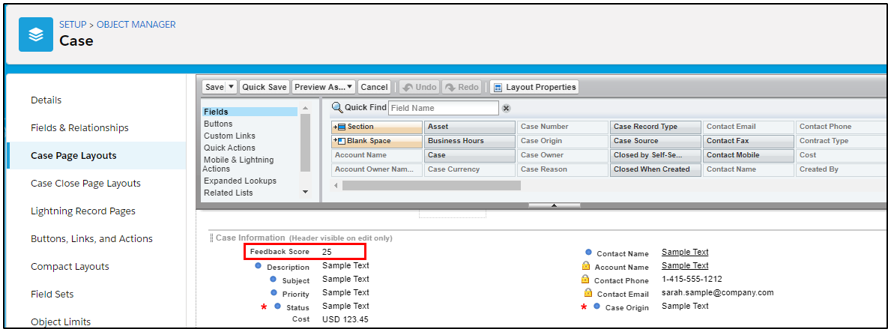
Save the page layout.
Test your Flow!
If everything has been completed successfully, we can now test our flow.
First, select a case that is NOT closed. We want to see that our flow does not display until the case is closed.
Change the case to Closed.

Our flow appears!
Fill in the survey, taking note of the numbers you selected. Remember for the radio buttons Yes = 2, Partial =1 and No = 0.
Click Next to complete the survey.
If everything went well, your flow will now display a message indicating the feedback has been completed for this case and the Feedback Score will be displayed on the case page:
If you got this far and everything worked, congratulations!!
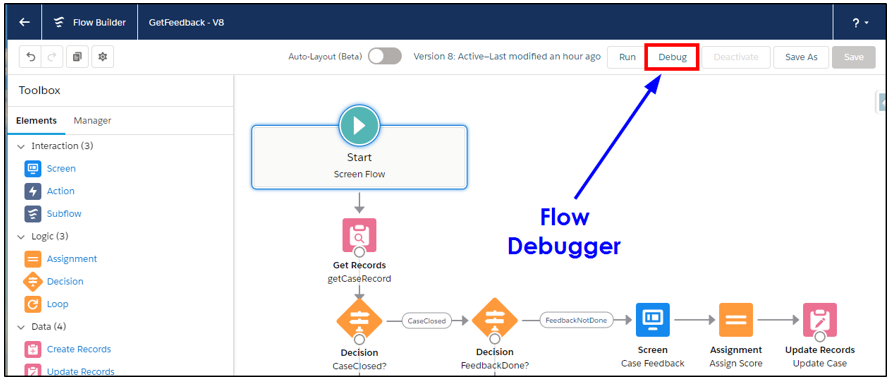
If something is not quite working as expected, go back and double check your configuration. You can also use the Debug function in the flow to step through the flow to help you identify errors.
Advanced Flow Features
Break your flow apart
For very complex requirements or to create re-usable components that can be used by other flows, you can create a number of sub-flows and call them from your main flow. This has several benefits:
- It reduces the complexity of the main flow.
- It isolates functionality within the sub-flow, making problem solving and debugging easier.
- Your sub-flows can be reused by other flows. If you have a common function that needs to be used several times in your application then you can write it once and call from many flows.
For example:
You need a flow that can take an Opportunity and create a single Order or multiple Orders -OR- take a Quote and create a single Order or multiple Orders. Rather than adding all this complexity into one flow, it is broken down into a main Flow and four (4) Sub-flows.
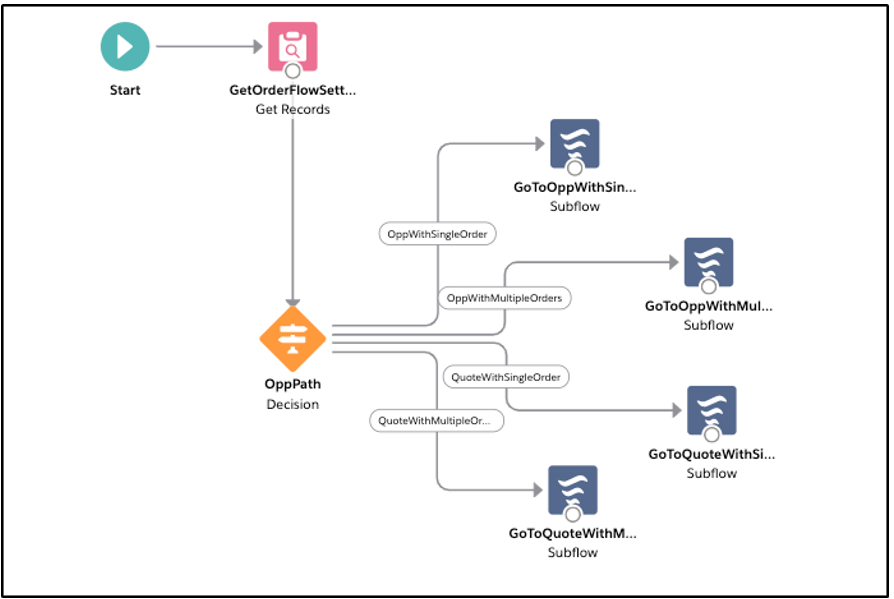
Reference: You can get this free flow template from www.taveza.com
here: https://appexchange.salesforce.com/appxListingDetail?listingId=a0N3A00000FMWAAUA5
Note:
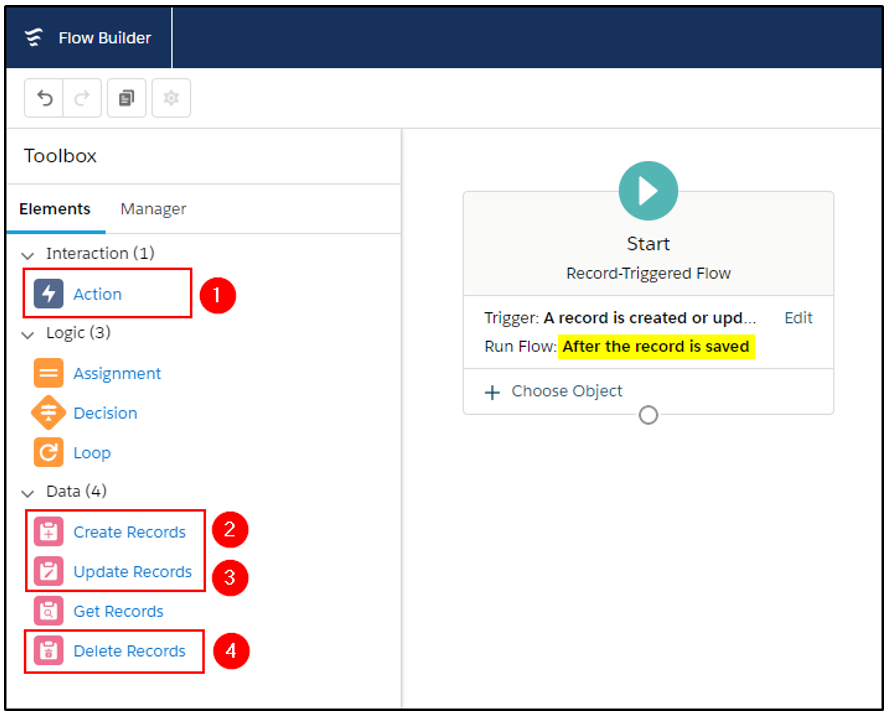
Sub-flows can only be used on flows that are run after the record is saved.
When we run our flow After the Record is Saved, we have access to the elements for Action, Create Records, Update Records and Delete Records:
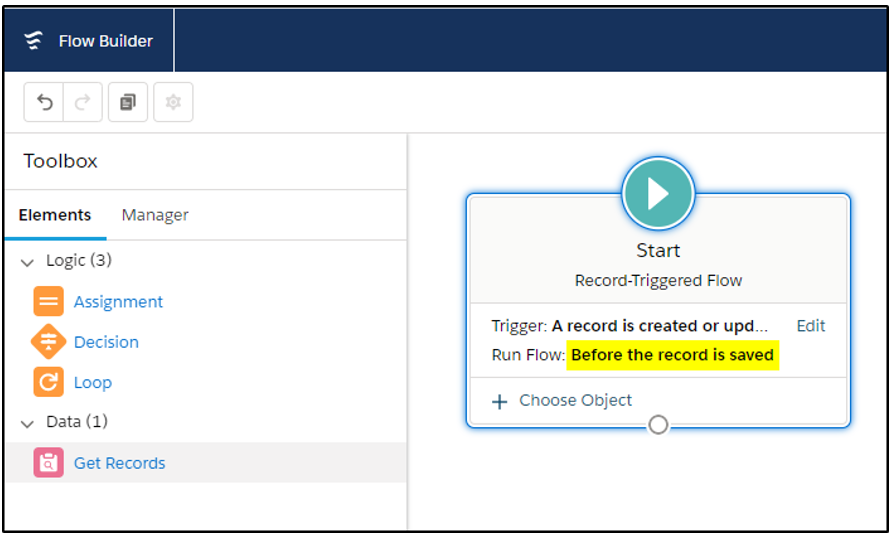
But on the Before Save Flow those 4 elements are missing:
Using Actions
Actions also let you break your complex flow apart – we have already seen how we can use sub-flows but there are many more actions available:
- Apex
- Quick Actions
- Post to Chatter
- Send Email
- Custom Notifications
- Route Cases
- Submit for Approval
Extending your flow
What happens when you need to do something that flow just can’t handle?
Call Apex or add Lightning Components to your flow!
Extending with Apex
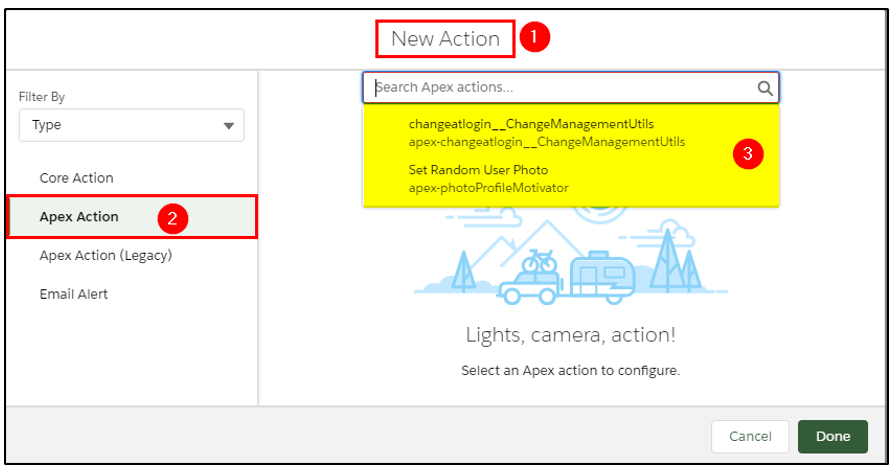
To call Apex, drag an Action (1) on to the canvas then select Filter By: Type (2) and then you can select one of the available Apex actions (3).
Reference: https://help.salesforce.com/articleView?id=flow_build_extend.htm&type=5
Extending with Lightning Components
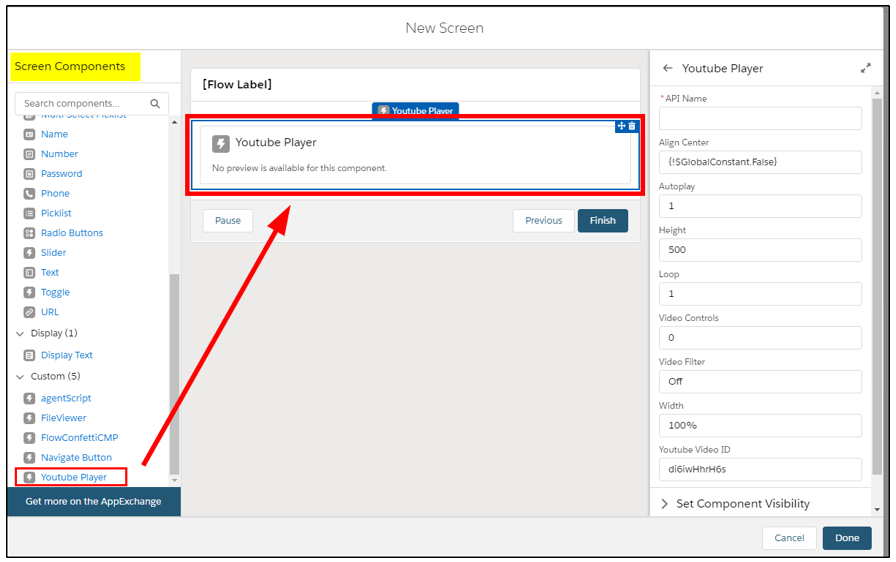
Adding a Lightning Component – here is a quick example of how an (already installed) component can be added to a Screen element:
There are plenty more free samples on the AppExchange here:
https://appexchange.salesforce.com/appxSearchKeywordResults?keywords=Flow%20actions
Remember: If you are installing into your Developer org you need to select Install in Production. A Developer Org is not a sandbox. Sandboxes only exist within a fully licenced Salesforce org.
Extending with Heroku
“This post focuses on expanding flows with Heroku compute. Specifically, how to expose Heroku apps as external services and securely access them via flows using Flow Builder as the low-code development environment.”

Naming Standards
Keeping a consistent naming convention is important to be able to quickly identify what a Flow does. I like to start with the object name, followed by a short description of what the flow does. e.g. Lead-UpdateRating
Get more great training resources with our online training material that provides everything you need to get certified in the following:
- Salesforce Administrator
- Salesforce Platform App Builder
- Salesforce Advanced Administrator
- Salesforce Sales Cloud Consultant
Visit our online training site at CertifyCRM.com

References
Refer to some of the resources listed here for some more inspiration and helpful examples demonstrating what you can achieve with a flow.
Get Started with the New Flow Builder
https://admin.salesforce.com/blog/2019/getting-started-with-the-new-flow-builder
An Introduction to Salesforce Flow
https://www.salesforceben.com/introduction-salesforce-flow/
Automation Champion – Learning Flow
https://automationchampion.com/learning-flow/
The Wizard’s Apprentice Lightning Flow Builder video series
https://thewizardnews.com/2019/05/28/wizards-apprentice-lightning-flow-builder-overview/
Jen W Lee’s Salesforce Blog
https://jenwlee.com/ Jennifer Lee has some great blog articles on how to flow.
Flow Components
https://unofficialsf.com lots of components that you can install and add to your flows.
Flow Tutorials
https://www.youtube.com/playlist?list=PL9kdg63vJl6C0URtd8NW18zcjaRSsczQ_
Automation Components
https://github.com/trailheadapps/automation-components/wiki
Flow Best Practices
https://help.salesforce.com/articleView?id=flow_prep_bestpractices.htm&type=5
Salesforce Automation Guide
https://salesforce-automation.herokuapp.com/
Architect’s Guide to Building Record-Triggered Automation on Salesforce Using Clicks and Code (Salesforce)
Process Builder vs Flow
https://www.salesforceben.com/process-builder-vs-flows-become-the-ultimate-admin/
Best Practices for Process Builder
One Comment